My dead Macbook - S01E01
On a sad day, not so long ago, my long time companion stopped working. It’s a mid-2012 Macbook Pro, the first “retina” model. I got it at night to watch Netflix after it spent the whole day charging, and I noticed it wasn’t charging anymore. The charger connector would not light up, and it still worked from the battery, but the battery wasn’t charging, and I knew what this meant: my laptop would stop working as soon as the battery got empty.
I have a degree in CS and have a pretty good understanding of electronics and digital systems, but I’m by no means an electronics engineer. I have been working with embedded systems more and more for the last few years, and as there’s also a lot of material on the internet, I think I’ll give it a shot at repairing my old friend. This will for sure become a series of posts on how I failed, or hopefully succeeded, at bringing my laptop back to life.
Getting it open was the first challenge. I had already opened it before, as I cleaned it a few times and replaced the wireless card to be able to unlock the computer using the Apple Watch (this model isn’t supposed to support that, unless you change this card). At that time, I bought cheap pentalobe screwdrivers in China, and well, they were cheap, but were not the right size and kinda damaged the screws when I used it. I had also tried to buy the “more expensive” pentalobe screwdrivers from China, and had similar results. I think it’s a hit and miss thing and if you are lucky you get good ones, but I was unlucky with my chinese pentalobe screwdrivers more than once, so I didn’t want to play this game again. I wanted to solve this problem once for all and bought the Mako Precision Bit Set from iFixit and totally recommend it, it’s the nicest screwdriver kit I’ve ever had, so it was a breeze to open/disassemble the Macbook, especially with the iFixit teardown guide.
I found out my board model is 820-3332A and managed to find the electrical schematics for the motherboard without much problem (as it’s old I guess?), and even found out there’s a fantastic tool called OpenBoardView to open .brd schematics and help navigating through components and lines. That, and a multimeter, was all I needed to get started with the troubleshooting. So I tried to find out how the charging system works and what could have gone wrong. A few Louis Rossmann videos later and I started measuring the tensions at multiple points in the circuit, and they were all zero. Deady Mc Deadface. Looked for short-circuited lines everywhere, and couldn’t find any.
After some research, I found out that Apple’s Magsafe charger is much more clever than I anticipated, and the Macbook talks to it through a 1-Wire interface, and has even some clever sensing features that shut it completely off in a safe way if things go weird, and they were weird. There is a chip that protects the 1-Wire interface from frying important things (MAX9940) but it was not even being powered, so I discarded it for now. The charging/battery management is done by an ISL6259AHRTZ chip, so I ordered some as it could very well be the problem. There is also an inrush limiter circuit, that uses two P-channel mosfet in one die (IRF9395TRPBF) and could be causing the problem. Ordered some of these too. Got pretty confident that this guy was faulty, as it would explain why I was getting the 0V. As these guys are SMD components, I needed tools. I got a TS-80 soldering iron because I found it super nice, and there’s even an open-source firmware for it! Also got a generic 858D hot air station. Also bought kits of SMD resistors and capacitors in different sizes (402 and 603), just in case I needed some. Ah and some nice no-clean soldering flux, as flux is absolutely necessary when working with SMDs. Was hesitant and didn’t buy any soldering paste.
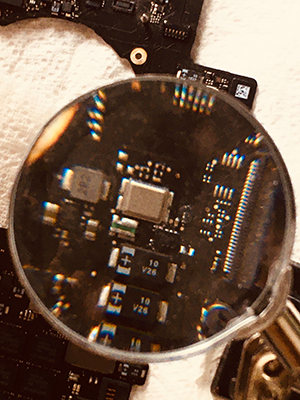
IRF9395TRPBF is the big rectangular greyish thing in the center.
Tools and components in hand, I started heating things. The IRF9395TRPBF was replaced, powered the magsafe and… nothing. But wait! plugged again… nothing. Sigh. Oh… plugged again, and… green light! Connected the fans and… fans spinning! Good news! Things seem to be working again… I guess? Not sure why it didn’t turn green the first time I plugged… oh well, it works! Put everything back together and voila, laptop back to life!
It’s alive!
Some keyboard keys were not responding properly, but that shouldn’t be hard to address. Success! Oh, no no no. Of course it could not be that easy. It started behaving badly. Fans spinning fast out of the blue, can’t read the battery percentage… I think it is the SMC misbehaving. And then suddenly, it turns off and the magsafe connector won’t turn on again. Sigh.
The SMC (system management controller) is a chip responsible for an unknown amount of important things in some computers. I know that for Macbooks it’s responsible for things like keyboard backlight, ambient light sensing, thermal management, some hard drive encryption tasks, power management, so, yeah, pretty important things. It’s a very special kind of chip as well, as it has software inside it. And it’s Apple software. So you guessed right, it’s not easy to find a replacement for this guy. Not only it’s a very hard to solder 157 contact BGA chip, but there are no public datasheets for this chip in specific (LM4FSXAH5BB), and even if you got one, you need to be sure it has the right firmware for your specific laptop flashed into it. Most repair shops take them off “donor boards” (dead boards which this chip is still functional), which have to be precisely the same model, and as they are dead boards you never know if the SMC is bad, so you replace and hope for the best. There’s a very nice presentation from Alex Ionescu on how important this chip is, how to flash it (if your computer still works), and some nice anecdotes. Tricky… now I really hope my SMC didn’t go bad. Also very interesting, I’d really enjoy to make some SMC tools to help other people.
Took the board out again, checked the voltages… yep! Now I have voltages different than zero. Well, that’s an adventure for another day, but, progress… I guess?